

Step 1
The first thing you need to do is figure out how long your fabric needs to be. Take a tape measure and measure across your body from your right shoulder to your left hip. On your shoulder the tape measure should be right where a t-shirt seam would be. On your hip measure to the top of your hip (where your hand would be if you were standing with your hands on your hips). I hope that's clear. Now take that measurement, double it, and add 6 inches (this extra is for baby room, and seam allowance). So if you measured 22 inches from shoulder to hip your total length would be 50 inches. This is how long you fabric needs to be.
Step 2
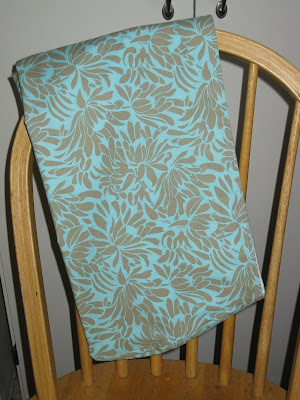
Now is the fun part... picking your fabrics. Choose 2 coordinating fabrics and cut them so each is 21 inches wide and the length that you calculated in the first step. (This will make your final sling 20 inches wide. You can go slightly wider if you would like, but DO NOT go any wider than 24 inches when complete. It is unsafe for the baby at that point.)
Step 3
Now, position your fabrics right sides together and fold in half width-wise.
 Make sure all layers of the fabric are laying smooth. Now, fold in half again, this time length-wise.
 Again make sure all the layers are smooth. You are going to be making another cut, so you really want all your fabric to be smooth and crease-free. (It has been brought to my attention that this photo makes it look like the material is narrower on one side. Sorry, that is just the angle of the picture. Your fabric should be a perfect rectangle at this point.)
Step 4
Using a pencil mark a curved line (like a half smile) along the side where all the loose ends of the fabric are. Notice that the curve straightens out close to the edge. Now, cut along that line through all the layers of fabric.
Step 5
Unfold the fabric, but leave the two pieces right sides together. Stitch each long side together. Trim edges to 1/4 inch if necessary.
 Turn right-side-out and press seams.
Step 6
Put the open, curved sides together and stitch through all layers.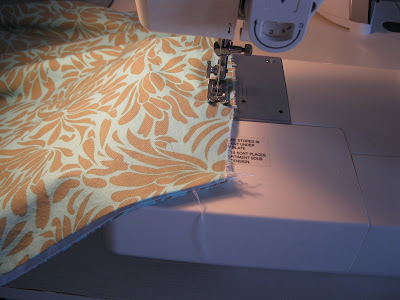 Trim edge to 1/4 inch if necessary.
 Turn so the other fabric is on the outside and stitch the curved side again. This makes a french seam. All rough edges should now be enclosed.
 Take the flap that the french seam made, and lay it flat. Stitch it in place.
Step 7
This step is completely optional, I just like the way it looks. Stitch all the way around each side of the upper edge and lower edge of the sling. Fold in half length-wise and your sling is finished.
I hope this tutorial was clear. If you find any problems with it, or something doesn't make sense, please let me know so I can correct it or clarify myself. If you make a sling, let me know. I'd love to see the finished product.
Thursday, March 5, 2009
Reversible Pouch Sling Tutorial
So now you get to see my 1st project I'm working on with the fabric I just got. This tutorial came about because I couldn't find a decent one ANYWHERE unless I wanted to pay for it, which I didn't. So here it is... my very first tutorial.
Subscribe to:
Post Comments (Atom)


22 comments:
Shari I am so excited that you posted this. I literally last night e-mailed Natalie saying...do you know where I can find out how to make a sling - I really want to just make one myself. Walah! Or however you spell it. Thanks for the info! Good luck also, I am assuming you have not had the baby, are you having contractions constantly or what?
Yes, constant contractions some are just stronger than others. I was in the hospital on Sat., but the Dr. decided to stop my labor. He said he was hoping to buy us another week. He thought it would be better that way. I'm sure he's right, but I'm just so sick of it all. UGH!
I want to see your sling when you're finished, and if you have any input on the tutorial let me know. Good luck!
Good luck with the baby. I am with you, sick of it all, I just want this baby out, of course as long as she's healthy. This last month is going to be torture! I will let you know when I finish the sling, you made it pretty clear so I don't forsee any problems. :)
Happened across your site and am thrilled to see a tutorial for a sling pattern. I love wearing my Babe and will definitely put this to good use!
Thanks for sharing!!
I love your projects! You did a great job on your sling tutorial!
http://mammadandcrew.blogspot.com/
Shari,
My only question, now that I finally bought my fabric, is in step 3, when you fold the fabric in half length wise after you fold in it half width wise, the picture seems like it is not as wide on one side as the other. It's all supposed to be symmetrical, right?
Yes. It is all symmetrical. I think it is the angle I took the picture at that makes it look that way. Sorry.
Thanks Shari - I guess I better get going and get it done before the baby gets here. I will send you a picture when I'm done.
What kind of fabric did you use? Is it cotton or a stretch? Thanks! Can't wait to try this!
Kim - the fabric I used is cotton, but you can use a stretch if you want. Just remember that you are going to have to compensate for that extra room you will have with a stretch material. I would start with the same measurements and then in step 6 after the first seam I would try it on and make any adjustments in the length at that point. Hope that helps. Good luck!
Hi Shari,
great tutorial, very easy to understand. One thing I was wondering though..if I measure 25 inches across, should the finished sling be 25 inches across the top of the sling or the bottom (where the pouch is)?
Thanks so much!!
Agnes
Agnes - It will be slightly larger than the 25 inches at the top. Don't forget to add that 6 inches into your measurements. If you're worried about length you can always add in a little more and then just try it on after you make the first seam in step 6 and make any adjustments. You can always make it shorter, but you can't make it longer.
I hope I answered your question. If not let me know.
I always thought pouch slings were too complicated for me, but this tutorial made it SOOOOO easy. I was able to make one in less than an hour! My little 5 month old fits perfectly and loves it :D I'm so happy to finally have a hip carrier. Thanks so much!
Easy to follow tutorial, but you might want to share the expected age/size of baby that will fit - I obviously should have thought through this myself, but I very carefully followed your measuring instructions and when I was done had to chop the sling in half and add a 6" panel so my 6 month old would fit... he's a chubby one but I doubt I could have gotten a baby over 8lbs in before I modified.
Hi Shari, nice to meet u here, I have used your tutorial to make my baby pouch. Feels free to see mine:
http://familymoza.blogspot.com/2010/12/kejayaan-terbesar-malam-ini-baby.html
Just a little problem, it hurts my shoulder when I used to carry my baby (around 7 kgs). What is the problem? Is it because of I'm using heavy cotton (a.k.a cotton canvas)?
Thanks for drop your comment in my blog. Will try to do another one using another types of material :)
Hi! I have used this tutorial, and it worked great! We went to the beach last week and we enjoyed it a lot.
Many thanks for posting it!
I would like to send you a small photo. How could I?
Hugs from Montevideo, Uruguay.
Thank you! I made an adorable strawberry print on one side, green silky fabric on the other, in 45 minutes for a baby shower tomorrow! I know it will be a hit!
Hi there, I have a couple questions. First, my fabric is only 44 inches. And second, do I have to use 2 pieces of fabric? Thank you. Kelly
I've always used a ring sling, but have decided to try your tutorial for a pouch style one for this baby. Thank you for sharing.
In step 6, is it both curved ends sewn together or just one end sewn shut?
Post a Comment